A deep understanding of the properties of steel is necessary in dealing with boilers. The most important properties of the boilers include:
• Tensile strength
• Hardness
• Toughness
• Fatigue strength
• High-temperature characteristics
Tensile strength is the ability of a material to withstand the outward axial force or pull as opposed to the compressive strength, which is the ability to withstand push. When pulled, the materials are subject to stress, and they tend to elongate, which is the strain. Stress-strain relationships of materials are vital because they provide data on the following:
• Yield strength
• Tensile strength
• Ductility
Under tension, a test piece elongates linearly up to the elastic limit, and returns to the original dimensions every time the load is removed without permanent deformation. This is expressed in Hooke’s law, which states that in this elastic range
• Strain is proportional to the stress
• Stress is equal to the strain multiplied by the modulus of elasticity
Beyond the elastic limit, the material enters plastic range when additional load results in a permanent deformation and the specimen does not return to its original shape. The elongation is accompanied by a uniform reduction in thickness. Yield point involves disproportionate elongation with no addition to the loading. Since this point is difficult to establish reliably, a specified value of plastic elongation is usually adopted, such as 0.1,
0. 2, and 0.5% of the original length. Yield strength is the load divided by the original area of the specimen to produce the desired elongation.
Thereafter, with increasing load, the specimen elongates too far with uniform thinning. At some point, there is neck formation in the middle of the specimen for ductile materials before the eventual breaking. Tensile strength is the breaking load divided by the original area of the specimen. In brittle materials, the necking does not take place and there is an abrupt rupture of the specimen.
Ductility is the percentage of elongation of the specimen up to the point of rupture or the percentage of area reduction with reference to the original length or area. In general, the strength of material decreases as the ductility increases. Strong metals tend to be hard and brittle.
For design purposes, tensile strength and ductility data at room temperature, and yield strength at room temperature and at elevated temperatures up to creep limit, are required for BQ steels used for PP manufacturing. The material codes provide specified values to be used in design, and for each ladle analysis, steel makers supply actual results for verification of compliance. Additional tests for ductility are conducted for tubes and pipes by way of tests for
• Flaring
• Flattening
• Bending
Hardness is the resistance to indentation or plastic deformation under static and dynamic loading. It is also a measure of resistance to abrasion, scratch, machinability, cutting, and drilling and is related to tensile strength.
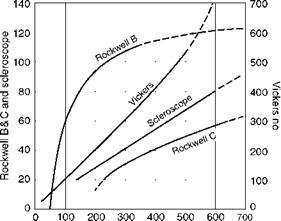
Hardness is determined by Brinnel, Vickers, or Rockwell tests in which a ball — or a pyramid-shaped point is pressed onto the surface of the metal with a specified force for a specific time, and the size of indentation is measured by a microscope to automatically determine hardness number. Smaller indentation means higher hardness. Hardness can also be determined by scleroscope in which the loss of kinetic energy as measured by the rebound of a falling weight is used for measurement.
The various hardness testing methods are not very exact. Also, no two methods measure the same parameters. Hence the comparison is approximate. Vickers-Brinnel relation is nearly linear, up to 400 with Vickers —5% higher than Brinnel. Figures 5.7 and 5.8 provide the comparisons.
Mohs hardness test measures scratch resistance. Talc is rated 1 and diamond 10, and all other materials between 1 and 10, as shown in Figure 5.9. This test is simple and quick. If one mineral fails to scratch and the next produces a scratch, the hardness of the tested material is between the hardness of the two minerals. The result is not accurate enough for the industry. Therefore, Mohs hardness test is not popular in the engineering field but finds extensive application in geology.
Toughness is a difficult term to define. It can be considered as the ability of the material to equalize a concentrated stress. It is the capability to tolerate localized stresses even above the yield point by plastically absorbing and redistributing the stresses. Under certain conditions, particularly at low temperatures, even very good ductile steels undergo a brittle failure when subject to concentrated stresses. Toughness is the property to resist this brittle failure.
|
|
Strain (%)
FIGURE 5.7
Stress-strain relationship.
|
Brinnel no |
FIGURE 5.8
Comparisons of hardness scales.
|
BHN |
![]() Moh’s scale Diamond I — 10
Moh’s scale Diamond I — 10
|
R |
|
C |
|
Corundum Topaz Quartz Orthoclase Apatite |
|
9 8 — 7 6 Б |
|
|||
 |
|||
|
|||
|
|||
|
|||
|
|
||
|
|||
|
|||
|
|||
|
|||
|
|||
|
|||
30
|
2 |
![]() Gypsum
Gypsum
|
10 |
![]() Plastics
Plastics
Talc 1
3
FIGURE 5.9
Mohs scale and its approximate equivalent hardness.
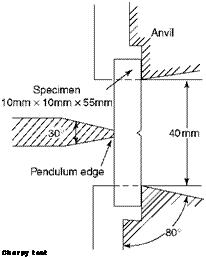
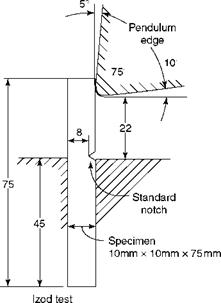
Charpy and Izod tests are the most common. In a Charpy test, the notched specimen is held at both ends in a simply supported manner, and in the Izod test, it is held at one end in a cantilever manner. A swinging pendulum from a specified height is allowed a free swing. The extent of rebound is measured directly in kilogram-foot-meters or pounds as the energy absorbed. Figure 5.10 depicts the two tests.
The mode of failure in the impact test changes from ductile (shear) to brittle (cleavage) as the temperature is lowered. The temperature range in which this change takes place is known as the transition temperature. Materials within and lower than this range can crack extensively under impact load.
Fortunately, PP steels of boilers have transition temperatures considerably below their operating temperatures. Heat treatable steels in quenched and tempered conditions have superior transition temperature properties. High-nickel steels exhibit low transition temperatures. There is no abrupt change in toughness properties of austenitic ss and other pure metals such as copper and aluminum, making them suitable for cryogenic conditions.
|
Charpy test |
|
FIGURE 5.10 Typical Charpy and Izod impact test specimens. |
![]()
|
OT |
![]() Re
Re
W
Number of cycles to failure (N)
FIGURE 5.11
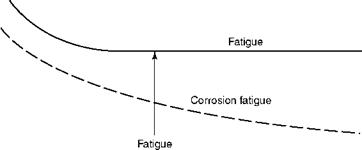
Corrosion fatigue.
Fatigue strength is the magnitude of cyclical stresses that the material can withstand for a specified number of cycles before failure occurs (Figure 5.11). For static loading, yield strength can be employed. It is the ability of the material to withstand the force without deformation for an indefinite period. When alternating, dynamic, or cyclical loading
|
|
FIGURE 5.12
Typical creep strains.
Takes place, the material suffers microscopic cracks along the grain boundaries that keep growing until failure takes place.
At sufficiently low stress values, the material can endure the cyclic loading indefinitely. This is the endurance limit. Changes of cross section or the stress concentration notches adversely impact the endurance limit of the material.
Tensile and yield strengths, which form the basis of a design, cannot be used for high temperatures. Even the data at high temperatures above 350°C are not adequate as the strength of the steels is affected by other factors such as creep and creep to rupture. SH and RH tubes and furnace tubes of supercritical (SC) boilers are the main PP components required for high-temperature properties.
Creep Stress
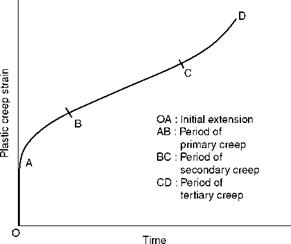
At elevated temperatures even with constant load, material elongates over time. This property is known as creep. Creep takes place in three stages after the initial elongation due to the initial load, which is proportional to the load and the temperature (Figure 5.12).
• Primary creep, characterized by decreasing rate of elongation
• Secondary creep, which takes place when the deformation is very low
• Tertiary creep, with an accelerating deformation leading to rupture
Creep is measured as 0.1 and 0.01% of elongation in 1,000 h, which is expressed as 1% in
10,0 and 100,000 h, respectively, for any material at a particular temperature.
Creep is affected by a number of factors:
• Carbide-forming elements such as molybdenum and tungsten and, to a lesser extent, chromium and vanadium help to improve the creep resistance of steels.
• Increased carbon content is beneficial up to 550°C.
• At higher temperatures austenitic steels and special alloys have superior creep resistance as compared with low — and high-alloy ferritic steels.
• Coarse grains in steel appear to be better than fine grains.
• As the surface reactions impair the creep resistance, additions of Si, Al, Cr, and Ni are found to be beneficial for enhanced surface stability.
This is actually the creep strength at a particular temperature when it is carried out to rupture the specimen in a specified time. The testing lasts a few hours to even 10,000 h. Values are suitably extrapolated and reported as the stress to rupture in 100, 1,000, 10,000, and
100,0 h for a particular material at a certain temperature. ASME specifies adoption of creep-rupture values for 100,000 h while calculating allowable stress for PP design.


 25 августа, 2013
  admin
admin 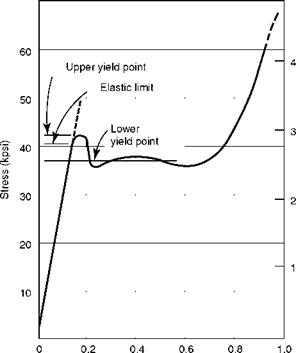
 Опубликовано в рубрике